Showing posts with label Sustainability. Show all posts

Sunday, May 10, 2020

Best Prepper Vegetable

My parents and grandparents gardened on a scale up to perhaps 10 acres, although typically smaller, and we grew, canned and ate some of our vegetables, year-round.   We understood the Soil Basics, Spring Planting Dates and Fall Gardens.  We Saved Seeds from our best Heirloom vegetables to plant what grows best from our own seed, and knew how many days until harvest.
They usually had a small Green House to start plants early from seed, and then set out the plants after the last frost and also to grow a few winter veggies. 


Starting from green house plants instead of seeds, gave them a few weeks head start and allowed an earlier harvest.  An early harvest began providing food sooner, and commanded a premium at the Farmers Market, when selling our crops, that was often three times (3X) higher than mid season crop prices. 

With my grandparents and dad surviving the great depression, and World War II Food Rationing, they understood their Garden was important for survival.  As a preteen boy during the Great Depression, my dad got a biscuit from government rationed flour and a spoon of scrambled eggs each day from their chickens and then had to use wilderness survival skills to find any additional food he was going to get.  Harvesting food from nature was much easier then than today due to the large population we now have.

The point is, my family did a lot of serious gardening.  From this gardening experience, I've developed some favorites like corn on the cob, green beans, pinto beans, okra, peas, potatoes, squash, & tomatoes, which grew well, taste good and in most cases, were easily preserved.  

But there is one vegetable, that was the easiest to grow and harvest, began to deliver food early, even before most of the other vegetables were planted, and continued to yield nutritious food for several months.   In addition, it was easy to cook and taste delicious.  All of these are great traits for the Best Prepper Vegetable.

That vegetable is Asparagus! Why you might ask?  You plant asparagus once, and let it grow for 2-3 years before harvesting, to let it develop a healthy root system; then each year around the first of spring, you have the first vegetable of the year, and it will continue to produce for several months.  It begins producing about the same time as my turnip greens (and taste much better), which is historically the first garden food of the year.  Further, no pesticides are required to protect from bug, which makes it a good Prepper Vegetable as pesticides may not be available in a serious SHTF Scenario.  It also grows in almost the entire continental United States (see zone map at the bottom) and is very nutritious.

Clearly, you can see this vegetable has a lot going for it.


You can plant seeds, but planting 2 year crowns (roots)  will get you a big head start on reaping your harvest.  I have Heirloom Mary Washington (a classic), Jersey Giant & Jersey Supreme varieties.  The Mary Washington are thin (mans little finger diameter) and tender and the Jersey varieties are thick (mans ring finger diameter) and produce more.  There are constantly new varieties, like AsparaBest, with higher yields that might also be worth trying, but I do like having multiple varieties for redundancy.  I would suggest having multiple plots, with one for each variety to avoid cross pollination.

Don't wait!  Get Started NOW, on your way to a healthier life style and security of your food supply.  With a low budget garden and very little livestock (like chickens), you can survive on what you raise.  Start your small Practice Garden today.

I've included some detailed planting & harvesting information at the bottom.

For additional information see the following links:  
Blog Table of Contents

Gardening Links
Gardening 101– Soil Basics
Green House for year-round food supply
Vegetable Planting Dates
Vegetable Days to Harvest

Seeds for Survival
Preppers Garden
Aquaponics

Prepper Livestock series
DIY Solar System


Or click on a label at the BOTTOM for similar topics.
Here is some additional planting reference information:

Product Details

  • Height: Grows 3 - 4 Feet tall.
  • Spacing: 12 - 18 inches apart.
  • Depth: Plant 6-8 inches deep. These plants can be planted with a trowel.
  • Spread: 12 - 18 inches.
  • Light Required: Full Sun in most cases, but some varieties are better for partial sun. 
  • Yield: Bears when roots are 3 years old, so if you purchase a 1 year plant, you can harvest in 2 years, if you order a 2 year plant you can harvest in one year. Limit harvest the first & second year. It will take 3 years after planting for the plants to be strong enough to be fully harvestable.
  • Size:  6 - 12 inch spears, depending on variety.
  • Zone: 3-8; Zone 9 for some varieties. 

  • Pruning: Cut the ferns down to ground level in the Fall once they have turned brown, or in the early Spring before new growth appears.
  • Foliage: Graceful, feathery green foliage.
  • Comments: Different varieties perform better in different soils, temperature regions, and are hardier than others.  For this reason, I recommend you check out the BLUE Links to select a couple of varieties for your region.  By having more than one variety, you can see what grows best and plant more of that type.
  • Fertilize with one cup of 4-3-1 (NPK) per 25 foot row or for every 16 to 24 plants depending on spacing and how many you have planted in 25'.
 Last note:  I have no affiliation with Gurney's who has good selection and information, so I link to them for your convenience only.

Monday, April 15, 2019

Sustainable Meal Planning - Nutrition

For a healthy Prepper Sustainable meal plan, you must have the right amount of Calories & Nutrition.  Below is a table showing how many servings you would normally need.

I left the size intentionally large to make this easy to read.


To see the original charts, click HERE

 For more information:

Blog Table of Contents
Top Rated Prepper Handbook Posts of all time 
Complete Sustainable Living Plan


Sustainable Meal Planning Series
Or click on a label below for similar topics.

Sustainable Meal Planning - Calories

For a healthy Prepper Sustainable meal plan, you must have the right amount of Calories & Nutrition.  Below is a table showing how many calories you would normally need.  However, living a Sustainable life style would have everyone working much harder, so use one column higher than normal.  I left the size intentionally large to make this easy to read.

Click HERE to see the Original Table

 For more information:

Blog Table of Contents
Top Rated Prepper Handbook Posts of all time 
Complete Sustainable Living Plan


Sustainable Meal Planning Series
Or click on a label below for similar topics.

Tuesday, April 9, 2019

Vote for the Prepper Handbook

The Prepper Handbook Blog is provided free to help families be prepared in the case of an Emergency, SHTF scenario or long term Sustainable Living.  If you enjoy our site, please take a moment to vote for us and see the other top Prepper Sites.


http://www.topprepperwebsites.com/vin.php?s=prepperhandbook2014 
For more information:

Blog Table of Contents
Top Rated Prepper Handbook Posts of all time 
Complete Sustainable Living Plan 
Prepper Handbook Recommendations 


Or click on a label below for similar topics.

Thursday, December 20, 2018

Backup Power Supply


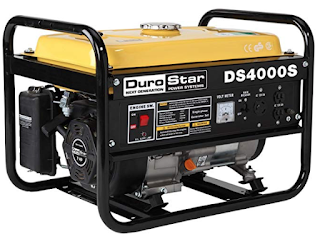
The cost for back up power is very affordable starting around $260 for a highly rated DuroStar DS4000S that can run for 8 hours on 4 gallons of gas.  At $2.00 per gallon, this is $1.00 per hour for electricity.  This could save your food from spoiling in the refrigerator &/or freezer, and easily pay for itself in one power outage. Short of running a heater, air conditioner unit or an electric dryer, this 4,000 watt generator will power all of the important things in most homes.  Here is a list of estimated power requirements.

Add to this, a cover (for the long periods where you hopefully don't need it) at a cost of $20 and an extra 14 gallon gas can that will run your generator for 28 hours.  This is the first backup power system I would purchase.


Another option I actually prefer is the Champion 3800 Dual Fuel Generator which will run for 9 hours on its 3.4 gallon tank or 10.5 hours on a 20 pound Propane Tank, which is much safer to store and has an infinite shelf life vs the commonly used E10 gasoline (we put in our cars) which has a 8 to 12 month shelf life.  This is about $0.76 per hour to run on gasoline and about $1.90 per hour for propane. Short of running a heater, air conditioner unit or an electric dryer, this 3,800 watt system will power all of the important things in most homes.  Here is a list of estimated power requirements.

Granted the propane is more expensive but it is safer and has a much longer shelf life which could make it lower cost long term.  I would keep propane stored for long term use, but use low cost gasoline while it was easily available.

 A generator is affordable short term, but even the lowest operating cost option ($0.76/hour) becomes expensive long term, costing $550 per month for electricity and requiring regular trips to the gas station  Solar power on the other hand requires a larger investment for equivalent power, but is cheaper to operate.

 A wind generator in conjunction with a solar power system is actually the best combination for long term, sustainable power, that will continue to operate long after the gasoline supply is gone.  When the sun isn't shining, the wind is probably blowing, providing a supply of electricity during the cloudy times, during the night and during the day.

Such a system might start with a Goal Zero Yeti 3000 Lithium Portable Power System for $2,400, as an addition to your generator system above.  This is basically a big (280 amp hour) battery that can be charged by your homes power, your generator above while its providing power for your home, or by solar panels or a wind mill once there is no gasoline to run generators with.  Fully charged, this will run your refrigerator for 50 hours. You can buy batteries at a much lower cost to build your own Starter Solar System, but this includes a lot of extras.


You can also run your Generator above for a few hours and charge this large battery to use during the rest of the day, extending your Generator fuel for potentially weeks.

For $575 you can add 200 watts of portable Goal Zero Solar Panels specifically designed for this battery power pack.  It is pre-wired and ready to go by plugging one connector in. This 200 watt system will run your refrigerator, an LED light and a box fan.  Here is a list of estimated power requirements.


The addition of 8 Solar panels for $2,500 will keep this battery charged and provide 800 watts of 12 VDC power for each hour of sun shine. This 800 watt system will run a refrigerator, freezer, LED lights, radio, charge your phones and more. Here is a list of estimated power requirements.


A 2000 Watt Wind Mill for $750 will top off your system and provide a more balanced supply of power, even during cloudy days or at night. Add this to the 8 panels above and you can power all of the important things in most homes, indefinitely. Note that the 800 watt solar system generates up to 800 watts when the sun is fully shining, and the 2,000 watt wind mill generates up to 2,000 watts when the wind is blowing hard.  Figuring a maximum of 50% on both system is reasonable when sunny and windy.  So on a windy sunny day, you might expect about 1,400 watts of power supply.  Here is a list of estimated power requirements


For more information:
Blog Table of Contents

Power Outage Preps
Power Outage Heater

EMP Survival
 
The SHTF Day One
Survive a 2 week Power Outage
Complete Sustainable Living Plan
Backup Power Supply
Backup Power for Under $50
 
 
See similar topics by clicking on the labels below

Tuesday, March 13, 2018

Sour Dough Bread

To make bread, our pioneer ancestors began with a "Starter" which makes the bread rise without yeast, baking power or baking soda.  Here is a recipe that can make one (1) to thirty two (32) one (1) cup Sour Dough Bread Starter, a.k.a. Pioneer Yeast. Prior to this, Corn Bread and Hardtack was popular along with Pemmican.
Starter
Ingredients

  1. Wide mouth sterile quart canning jar(s)
  2. Dechlorinated Warm water (1800's recipe specifies spring water) - 1/2 cup to start. If your tap water is treated with chlorine, you can purchase de-chlorination tablets to remove it, or let it sit out for 24 hours. The minerals found in "hard" water may help the yeast culture develop, so using distilled water is not recommended.
  3. 3-1/2 to 32 cups of Flour (depending on how much you want to make) - 1/2 cup to start
  4. Cheese cloth or clean dish cloth
Procedure
  1. Pour 1/2 cup of water in to your jar and stir in 1/2 cup of flour.

  2. Cover with the cloth and set this in a warm place for 24 hours.

  3. After the first 24 hours, add/feed 1/2 cup of water and 1/2 cup of flour; mix in, cover and sit in a warm place for 24 hours. Repeat this every 24 hours until the mix looks frothy or foamy, then its ready.  This can take up to a week and make lots of starter. You can bake lots of bread, share them, freeze them, dry them, or discard the extras. 
  4. Dried starter is a good back up and can last for years.  Simply spread it thin on wax paper and dry at the lowest dehydrator setting; then store in a cool dark place in a container. Freeze in a freezer bag when starter is at peak rise; this should last a year.  To use these, bring to room temperature and feed.
  5. Put your starter in a jar with holes punched in the lid (is must breath) and keep it refrigerated.
  6. Feed it 1/2 to 1 cup of flour and water once per week while refrigerated.  Note:  A watery layer called "Hooch" will form on the the top.  You can stir this back in, or pour it off to promote faster growth.
  7. Before making sourdough bread, you will need to make a sponge or proof your starter.  To do this, remove the starter from the refrigerator and bring it to room temperature.  
  8. Add 1 cup of flour and 1 cup of warm water to your quart jar of starter and stir until lumps are gone.
  9. Place this in a warm place until it shows lots of bubbles on the surface.  Now it is ready to use in bread. 
When baking bread, 2 cups of starter are the equivalent of one (1) table spoon or packet of modern dry yeast which is sufficient for a loaf made from 3-4 cups of flour.  To make waffles or pancakes, just use the proofed starter after it has risen to its peak.

Remember to feed room temperature starter every day and refrigerated starter every week by adding equal amounts of water and flour (1/2 cup each).
Bread
Ingredients
  1. 2 Cups proofed starter
  2. 4 tsp sugar
  3. 2 tsp salt
  4. 2 tbs butter or oil
  5. 3 cups flour

Procedure
  1. Mix starter, sugar salt and butter together and mix well. On a floured work surface, knead in flour a little at a time, forming a flexible bread dough.  Make sure the dough is well kneaded.
  2. Put the dough in a bowl and cover with a cloth; place in a warm place and let it rise.
  3. After rising, press it down and knead it again.  Then make it into a loaf and place in a lightly greased loaf pan.  Cover with a cloth and allow it to rise again in a warm place until it doubles in size.
  4. Bake in the oven for 30 to 45 minutes at 300 to 350 F. Bread is done when the crust is brown and the bottom sounds hollow when thumped with a wooden spoon. 
  5. Remove bread from pan and allow to cool before slicing
  6. Enjoy

For additional information see the following links:
Blog Table of Contents

Complete Sustainable Living Plan
Blog Table of Contents
Acorn Flour Pancakes
Pemmican Recipe
Hardtack Recipe
Corn Bread
Sour Dough Bread
Corn Fritters
Apple Cider Vinegar
More on making Vinegar
Backing Soda vs Yeast
Baking Soda uses

See similar topics by clicking on the labels below  

Saturday, February 10, 2018

Corn Fritters

The simplest pioneer bread was the corn fritter.

Ingredients
  1. Corn Meal - Two (2) Cups
  2. Boiling Water - Just enough make a thick dough; boil 1-1/2 cups and use part of it.
  3. Salt - One half (1/2) Teaspoon 
  4. Optional Spices - peppers, onions,  corn kernels, etc. 
  5. Shortening, lard, beacon grease, bear fat or any type of cooking oil
  6. Cast iron skillet - 11"-12" diameter, or dutch oven
Procedure
  1. Mix the corn meal, salt, spices and water thoroughly with a spoon until it becomes a thick dough
  2. Form the dough in to thin patties about 1/4 to 1/2" thick and about 4" diameter to pan fry.  Form in to 1" diameter x 5" long bread sticks for deep frying.  Avoid over packing both.
  3. Heat the cooking oil over a stove burner or open fire till hot.
  4. Cook the patties in the skillet, turning occasionally until light brown on both sides.  Deep fry corn bread sticks in the dutch oven. Roast on a flat rock beside the campfire. 

For additional information see the following links:
Blog Table of Contents

Complete Sustainable Living Plan
Blog Table of Contents
Acorn Flour Pancakes
Pemmican Recipe
Hardtack Recipe
Corn Bread
Sour Dough Bread
Corn Fritters
Apple Cider Vinegar
More on making Vinegar
Backing Soda vs Yeast
Baking Soda uses

See similar topics by clicking on the labels below  

Wednesday, January 24, 2018

Budget Garden Preparations

During World War II, the United States was forced to ration food. It was the family Victory Gardens that pulled the hungry nation through.
 
IT CAN HAPPEN AGAIN!
Two percent (2%) of the US population feeds the other 98% as well as millions of other people around the world.  This makes our food supply chain very fragile.  Many things could disrupt it.

Every adult who is responsible for the lives of others should have the following gardening preps:
  1. Garden Hoe - top quality and sharp - $57
  2. Round point shovel - no plastic nor fiberglass - $40
  3. Garden Rake - 16 metal teeth - $30
  4. Vegetable Heirloom Seeds - sealed and kept frozen; rotate them each year - $16
  5. Fertilizer - use compost or 10-10-10 sparingly - $12
  6. Quality Garden Hose ($35) and metal water sprinkler ($8) IF you don't have one already.
  7. Gardening Book -  The Vegetable Gardner's Bible is a good choice - $20
All tools should be good quality, heavy duty, with hard wood handles that can be easily replaced and no plastic. Preferably Made in the U.S.A.  The hoe is the tool you will use the most so having an extra one is a good idea.  Doing so will also allow two people at once to work in the garden.

I recommend alternating your seed source each year to provide diversity.  Date each container of seeds when you put them in the freezer.  Don't discard old seeds as they are good for 2-5 years although the germination rate decreases.  I plant or spread my old seeds some where, in the woods, in a meadow, along the back roads, creek or river in hopes of having a hidden food or seed supply in the future, if ever needed. Some plant seeds or plants around their apartment hedges and in the flower beds with a small stake so the lawn care people don't pull them up.

Compost is a great natural fertilizer, but if not available, a commercial time release 10-10-10 fertilizer is good for beginners as it will reduce the risk of burning your garden up from over fertilizing.  Experienced gardeners will use different fertilizers for different vegetables and based on the results of soil tests.

There are a number of good Gardening books on Amazon.  Get one that is rated four stars or better with a low percentage of 1 star ratings.  The more ratings by verified buyers, the more reliable the rating. Get a hard copy book, not an electronic version. 

The one time investment for quality tools is less than $200, then $15 for fertilizer and then less than $20 per year for the seeds for a operating cost of $35 each year for a productive hobby and hundreds, if not thousands of dollars worth of fresh healthy food.

Beyond this, an electric Garden Tiller is a great addition to help prepare your soil.  Start breaking up your garden plot by February before the grass and weeds start growing, then again a month later.

Don't wait! Enjoy fresh grown vegetables this year.


For additional information see the following links:
Blog Table of Contents

Gardening Links
Gardening 101– Soil Basics
Green House for year-round food supply
Vegetable Planting Dates
Vegetable Days to Harvest

Seeds for Survival
Preppers Garden
Aquaponics

Prepper Livestock series
DIY Solar System


Or click on a label below for similar topics.

Sunday, January 14, 2018

Corn Bread

Pioneers depended heavily on Corn Bread instead of our wheat bread of today, because corn and its larger kernels were much easier to harvest than the smaller wheat or rye seeds, especially without equipment. Prior to this, Hardtack was popular along with Pemmican.  In later years, Sour Dough Bread became a popular bread.

Grow corn until it dries out, then harvest the ears of corn and store in a cool dry place until needed.  Feed the corn stalks to your hogs or till them back in to the soil.  Take stored corn ears and grind the corn in to meal; Pioneers used stones to do this.

Ingredients
  1. Corn Meal - Two (2) Cups
  2. Large eggs - Two (2)  
  3. Butter Milk - One and one half (1-1/2) Cups
  4. Sugar - 1/4 Cup; Pioneer alternative: Honey
  5. Flour - 1/4 Cup; Pioneer alternative: Sour Dough Starter
  6. Baking Powder - Two (2) Teaspoons; Pioneer alternative: Sour Dough Starter
  7. Crisco- One (3) Table Spoons; Pioneer alternative: animal fat
  8. Salt - One (1) Teaspoon 
  9. Black Cast Iron Skillet - 11"-12" Diameter 
In the absence of butter milk, you can 1 tablespoon of vinegar per cup of regular milk.  Without flour or a sourdough starter, you can still make our Corn Fritters. which requires only corn meal, water and seasoning.
Procedure
  1. Heat over to 400 F
  2. Put the Crisco in the skillet and sprinkle the bottom with corn meal. 
  3. Put the skillet in the oven and preheat. 
  4. While the oven heats up, mix the remaining ingredients in a bowl until smooth
  5. Pour the mix in the preheated skillet and bake for 30 minutes, or until the top is lightly brown. 
  6. Slice in to triangles and serve.
For additional information see the following links:
Blog Table of Contents

Complete Sustainable Living Plan
Blog Table of Contents
Acorn Flour Pancakes
Pemmican Recipe
Hardtack Recipe
Corn Bread
Sour Dough Bread
Corn Fritters
Apple Cider Vinegar
More on making Vinegar
Backing Soda vs Yeast
Baking Soda uses

See similar topics by clicking on the labels below