Sunday, September 3, 2017

Bear: Firearms or Pepper Spray?

Here is a great story from OutdoorLife.com 

Almost every backcountry hunter has pictured some version of this: An unexpected rustling in the underbrush. The flash of black (or brown) fur. A huffing sound. And then suddenly—snap!—you realize you’re about to have a run-in with an agitated bear. How do you react?

For most of the 20th century, biologists and hunting guides (and magazines, including this one) recommended firearms for self-defense from carnivorous mammals. But in 2012, the Journal of Wildlife Management published a groundbreaking paper, “Efficacy of Firearms for Bear Deterrence in Alaska.” Co-authors Tom Smith and Stephen Herrero analyzed public records, media accounts, and anecdotal information reaching back to 1883. The study examined 269 encounters between 357 bears (brown, black, and polar) and 444 humans, and concluded that people who used firearms for self-defense against bears “suffered the same injury rates in close encounters with bears whether they used their firearms or not.”

Now widely cited by backcountry-area risk managers, wildlife biologists, and bear experts, the study further concluded that bear spray has a better success rate than firearms at neutralizing a bear encounter, and that spray is also less likely than firearms to cause collateral damage to humans or other animals.

Aerosol spray is allowed in every backcountry area in the United States. It’s easy to buy, nontoxic, simple to use, and—because it contains capsaicin, a chili pepper–based chemical that causes intense irritation but no serious physical injury—can be deployed against any threat, including aggressive dogs and human attackers.

When you’re buying pepper spray for use against bears, look for formulations with the highest possible concentration of capsaicin, but avoid mace or other toxic ingredients.

Here are recommendations on bear spray from wildlife technicians, backcountry guides, and others who work and recreate in bear country.

The Value of Practice
Alaskan wildlife biologists recommend UDAP bear spray for its large canister size and impressive range.

Make sure the canister is easy to carry and deploy. Scatbelt offer versatile holster options.
Check local jurisdictions for any restricted ingredients. Sabre spray is generally allowed in Canada, where other formulations may be prohibited.

Replace pepper-spray canisters annually, and practice with the outdated spray so you are familiar with holster deployment and trigger release. Some retailers offer practice canisters filled with pressurized water.

Practice in situations where you will be surprised and have only seconds to react, says Mike Matheny, the founder of UDAP and himself the survivor of a grizzly attack. “You have far less time than you think.”

Formal pepper-spray training is available from Insights Training Center ($90).

The Case for a Bear Gun
Not everyone who works in bear country relies on spray.

Alaska game wardens and backcountry rangers might carry bear spray, but their go-to protection in bear country is a pump-action shotgun loaded with slugs. That was the takeaway from a week in Alaska, training with officers who encounter bears on the job.

The most popular model in the class was a short-barreled Remington 870 Synthetic Tactical. Other favorites are the Winchester SXP, Mossberg Scorpion, and Benelli Nova. The favored sidearm is a Ruger SuperRedhawk Alaskan model in .454 Casull. For rifles, it’s the Ruger Guide Gun or CZ Safari Magnum in .375 Ruger or .375 H&H. —Larry Case

You Might Also Like: Best Grizzly Guns: 9 Great Guns for Brown Bear Hunting and Backcountry Defense

Read the original article
 
JR NOTE:  After reading this, I still opt for both (gun & pepper spray).  While those who use guns sustain the same injury rate, they may be in a more dangerous position.  I will use Pepper Spray first, as a deterrent, if the bear is not charging.  While a Pump shot gun is good, it is less reliable in a tense split-second event than a Double Barreled Shotgun.
So while the double barreled shotgun is limited at two rounds before reloading is necessary, those two rounds can be fired quickly and reliably.

For more information, see:
Blog Table of Contents


Noodling


Noodling is a form of fishing with your hands that raises a number of questions.

Does a flathead bite hurt? Aren't there snakes down there? How do you find the holes? Do y'all clean all those catfish? Hunting editor Will Brantley and his brother—two veteran noodlers—answer some common questions about catfish noodling.

Click HERE to watch the Field & Stream video.

For more information, see:
Blog Table of Contents

Survival Fishing
3 Odd Techniques for Primitive Fishing
How to catch your own live bait

Complete Sustainable Living Plan 

Also see Fishing Gadgets Hub for a detailed write up on the subject.

Sunday, August 27, 2017

Power Outage Preps


Drinking water for an extended Power Outage is important. Our post on Emergency Water is very complete and informative with a water storage and rotation plan that would work for any home.

But we must have a way to prepare food. The charcoal allows you to cook food as would an inexpensive cook stove like the one below.


Our post on Food Preparation & Preservation covers more detail on this topic.


Another nice item are these solar powered lights. 


With some inexpensive hardware, or a flower vase, you can spread them around your home to provide light.  


The quality ones use rechargeable AA or AAA batteries and can be used as a solar powered charger.  They are also brighter and last longer. Having a set of each (AA and AAA) is ideal so you can charge all your small batteries.


When you are not using these for lighting or to charge your batteries, they make attractive lights for your yard and provide an added measure of Home Security.  


For more information:
Blog Table of Contents
Power Outage Preps
Power Outage Heater
DIY Solar System 
The SHTF Day One
Survive a 2 week Power Outage
Complete Sustainable Living Plan 

Flood Bugout Bag


What should you have packed and ready to go in the event of a flood or hurricane?  

Here is a good list, but put each individual item in a water proof bag or case:

  1. Water resistant backpack
  2. Medicines, glasses, contacts, important documents, cash, and a First Aid kit
  3. Rain poncho, rain boots, umbrella, children's floats or life vests (wear/carry these)
  4. Change of clothes, & a blanket in a water proof bag (typical on all items)
  5. Drinking water (stainless steel bottle, camel-back, refillable containers)
  6. Dry foods, raisins, beef jerky, MRE's, cooked easy open can foods
  7. Fully charged cell phone in a water proof case
  8. Hand crank radio / flashlight / signal light in a water proof bag
  9. Hand held MURS Communications Radios in a water proof bag
  10. Chargers, cords and extra batteries in a water proof bag
  11. Folding knife, fire starter, Bic lighter & waterproof matches
  12. Area Map (waterproof) & compass in a water proof bag
  13. Good handgun in a good moisture resistant holster & ammo in water proof bag
  14. An inflatable raft, pool, float or wagon to carry some of your items
 For more information see:

Blog Table of Contents
Emergency Water Supply
Modern Home Security
Survive a 2 week power outage
Sustainable Lighting  

Riot & Looting Preparations
Natural & Man Made Disaster Preparation
Emergency Essentials Disaster Preparations  
Urban Security Plan

Hurricanes 

Beginner Prepper List   
Wilderness Survival Pack (Video) 
Wilderness Survival
Delivering Babies
Global Climate Facts

Friday, August 25, 2017

Edibility Test

Knowing the Universal Edibility Test is important for any Wilderness Survivalist. There are many plants throughout the world. Tasting even a small portion of some can cause severe discomfort, extreme internal disorders, and even death. Therefore, if you have the slightest doubt about a plant's edibility, do not eat it. Particularly avoid mushrooms unless you have been taught well which are edible. If you believe it is edible, first apply the Universal Edibility Test to be as safe as possible before eating any portion of it.


1.     Separate the plant into its basic components - leaves, stems, roots, buds, and flowers.
2.     Test only one part of a potential food plant at a time per person. If you have two people, you can test two parts; one each. However, keep at least one person well to care for those who could potentially get sick from this test.
3.     Smell the food for strong or acid odors. Remember, smell alone does not indicate a plant is edible or inedible.
4.     Do not eat for 8 hours before starting the test, especially anything new or unusual.
5.     During the 8 hours you abstain from eating, test for contact poisoning by placing a piece of the plant part you are testing on the inside of your elbow or wrist. Usually 15 minutes is enough time to allow for a reaction.
6.     During the test period, take nothing by mouth except purified water and the plant part you are testing.
7.     Select a small portion of a single part and prepare it the way you plan to eat it.
8.     Before placing the prepared plant part in your mouth, touch a small portion (a pinch) to the outer surface of your lip to test for burning or itching.
9.     If after 3 minutes there is no reaction on your lip, place the plant part on your tongue, holding it there for 15 minutes.
10.  If there is no reaction, thoroughly chew a pinch and hold it in your mouth for 15 minutes. Do not swallow.
11.  If no burning, itching, numbing, stinging, nausea, or other irritation occurs during the 15 minutes, swallow the food.
12.  Wait 8 hours. If any ill effects occur during this period, induce vomiting (salt water) and drink a lot of water.
13.  If no ill effects occur, eat a small hand full of the same plant part prepared the same way. Wait another 8 hours. If no ill effects occur, the plant part as prepared is probably safe for eating, especially in small quantities.

CAUTION
Use this test at your own risk, as the author, publisher, and affiliates accept no responsibility for your use of this. Test all parts of the plant for edibility, as some plants have both edible and inedible parts. Do not assume that a part that proved edible when cooked is also edible when raw. Test the part raw to ensure edibility before eating raw. The same part or plant may produce varying reactions in different individuals. Boiling and draining the juice several times can also reduce your risk.

Because this test is time consuming, you only want to use it for plants that are plentiful so you get enough to eat. Do not over harvest. Leave at least 10% of the more mature (less tender) plants to reproduce.

To learn more about edible plants, visit this excellent website: http://www.foragingtexas.com/

 For additional information see the following links: Blog Table of Contents

Thursday, August 17, 2017

Primative Fire building


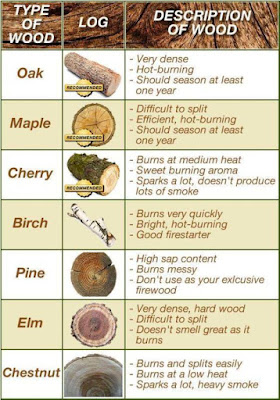
True Survivalist can make fire using NO man made materials. This is what I call "PRIMITIVE fire starting" and what we will focus on in this post.  This means a friction fire and dry materials to work with. Even then, its not easy and it takes practice. Preparation and selecting the right wood represents at least 51% of a successful fire.

For more on selecting the best fire wood click HERE.

For those who haven't tried it, I'm going to assure you that true primitive fire building is challenging. But as we have taught in our Rule of 3 which we use for setting survival priorities, shelter and warmth is our #3 top priority.  In a wilderness survival situation, #2 is likely irrelevant, making shelter and warmth our #2 priority.

In studying fire building, I found an awesome website on making fire, so rather than re-invent the wheel, I am going to simply list links to their site and add comments within the links. So here we go.

Stay Hunting on Fire building

   ​Tinder
   Kindling
   Firewood 
   Water
1. Hand Drill
Simple components, but hard to generate fire.  Requires a dry little finger diameter "drill" rod about the length of your lower leg or arm and it must be straight and smooth.  The bottom end should be roughed up, or sanded with a rock; the top end pointed and smooth. Soft Popular, Cyprus, Willow, Cedar woods are good to use.  A dry fire board with a new hole and V notch in the edge is the second component, along with a base board to catch the coal.  Then after about 2 minutes of hard work, you should have a coal.

2. Fire Plow
Female sotol or yucca, found in dry regions, is the best wood to use.  With a minute and 20 second of friction work, you can have a coal.

3. Bow Drill
This is the easiest method, IF you have good cordage.  If not, you can spend more time finding, making and repairing cords than building fire with the Hand Drill. 

4. Fire Saw
With large dry bamboo takes about 1 minute of friction generating work after 10-15 minutes of getting ready.

For additional information click on the link below:
Blog Table of Contents
The Rule of 3 (set priorities by this)


Thursday, August 3, 2017

Nuclear Survival

Even a limited nuclear exchange would destroy everything for potentially hundreds of miles, sending up enough dust into the atmosphere to partially block the sun for years, causing drastically cooler conditions.  Earth could enter a man-made Ice Age or a Nuclear Winter which may be more severe than an Asteroid Impact Winter. The EMP from a nuclear exchange could destroy all electronics that are not shielded by a Faraday cage or metal enclosure. A solar flare could do the same.
Humans have survived an Ice Age before, but not during a time when our survival skills and preparations were so low.  The good news is that survival after a nuclear exchange is possible with a few preparations.


Such Preparations would fall in two categories 
1) Surviving a 3-10 year winter, tidal waves, fire storms and acid rain.  Within 20 days, the global average temperature would drop from 58 degrees (F) Fahrenheit to 35 F, recovering about 10 degrees after a year or two.  By this time, 1/3 or more of the northern hemisphere (all of Canada and Northern US) would be covered year-round by snow.  The entire earth would experience freezing in the winter, and only the darkest red areas would not be frozen year-round.

 2) Surviving the "break out" after the sky clears, and the weather warms enough to begin life outside again.  The risk of unusually high ultraviolet exposure exists as the skies clear after being scorched. Disease from the fatalities decaying is a serious risk.
1) Surviving a 3-10 year winter
It could happen without any warning with only a matter of days to react.  So a high level of preparation and readiness is important. What should we prepare for?
  • Living underground where the earths temperature is more constant may be required.  If not, a well-insulated shelter with a large supply of firewood, diesel or propane would be required making an "Event" like this, one of the most difficult to be prepared for.  Note that an underground shelter also protects from radiation as well as severe storms and cold.  See: Concrete Bunkers
  • A ten year supply of long shelf life foods, water & warm clothing.  See the post:
Identifying nearby food warehouses, school cafeterias and other such places that feed large numbers might be a place to salvage food.  Animals that survive will likely be underground, underwater or able to withstand cold and eat grasses under the snow or bark and twigs of trees like goats, rabbits & deer.
  • Green House to maintain your seed supply over such a long time and provide a small amount of food.
  • Security plans with a large supply of Ammo to protect what you have. Here a few links:
                 Passive Layered Security
                 Urban Security
2)  Surviving the break out
Nothing would be worse than surviving the extended winter and then not being prepared to survive the new world.  Here is what you might need and some of this could be salvaged from hardware and farm supply stores.
  • Extensive Farming and Ranching supplies, including seeds, plants, livestock, feed, tillers, seeders, garden tools like shovels, hoes, and rakes.  Chickens, dogs, goats, pigeons, and rabbits are good animals to have.
  • Green House to grow foods year-round.
  • Hand tools like saws, axes, drills, nails, water pumps & barrels.
  • Farming and Ranching Skills
  • Security is still important as it will be easy to let your guard down at this point and be caught unprepared.
  • Reproductive age adults for human re-population.
  • Substantial loss of land based animals; large bodies of water may be a key source of natural food supply.  
  • Snow melting will cause flooding, even in normally dry places.  
  • Decaying animals may result in high amounts of airborne disease.
At this point, common long-term survival preparations are needed in addition to those to handle cooler and more erratic weather and shorter growing seasons.  There is a tremendous amount of detail regarding a long-term sustainable meal plan that is important. How much do I need to plant and how many animals do I need to raise.  The Prepper Handbook by JR Ray on Amazon covers all of this in great detail, so we will not duplicate it here.  
For additional information click on the link below: