Thursday, August 17, 2017

Primative Fire building


True Survivalist can make fire using NO man made materials. This is what I call "PRIMITIVE fire starting" and what we will focus on in this post.  This means a friction fire and dry materials to work with. Even then, its not easy and it takes practice. Preparation and selecting the right wood represents at least 51% of a successful fire.

For more on selecting the best fire wood click HERE.

For those who haven't tried it, I'm going to assure you that true primitive fire building is challenging. But as we have taught in our Rule of 3 which we use for setting survival priorities, shelter and warmth is our #3 top priority.  In a wilderness survival situation, #2 is likely irrelevant, making shelter and warmth our #2 priority.

In studying fire building, I found an awesome website on making fire, so rather than re-invent the wheel, I am going to simply list links to their site and add comments within the links. So here we go.

Stay Hunting on Fire building

   ​Tinder
   Kindling
   Firewood 
   Water
1. Hand Drill
Simple components, but hard to generate fire.  Requires a dry little finger diameter "drill" rod about the length of your lower leg or arm and it must be straight and smooth.  The bottom end should be roughed up, or sanded with a rock; the top end pointed and smooth. Soft Popular, Cyprus, Willow, Cedar woods are good to use.  A dry fire board with a new hole and V notch in the edge is the second component, along with a base board to catch the coal.  Then after about 2 minutes of hard work, you should have a coal.

2. Fire Plow
Female sotol or yucca, found in dry regions, is the best wood to use.  With a minute and 20 second of friction work, you can have a coal.

3. Bow Drill
This is the easiest method, IF you have good cordage.  If not, you can spend more time finding, making and repairing cords than building fire with the Hand Drill. 

4. Fire Saw
With large dry bamboo takes about 1 minute of friction generating work after 10-15 minutes of getting ready.

For additional information click on the link below:
Blog Table of Contents
The Rule of 3 (set priorities by this)


Thursday, August 3, 2017

Nuclear Survival

Even a limited nuclear exchange would destroy everything for potentially hundreds of miles, sending up enough dust into the atmosphere to partially block the sun for years, causing drastically cooler conditions.  Earth could enter a man-made Ice Age or a Nuclear Winter which may be more severe than an Asteroid Impact Winter. The EMP from a nuclear exchange could destroy all electronics that are not shielded by a Faraday cage or metal enclosure. A solar flare could do the same.
Humans have survived an Ice Age before, but not during a time when our survival skills and preparations were so low.  The good news is that survival after a nuclear exchange is possible with a few preparations.


Such Preparations would fall in two categories 
1) Surviving a 3-10 year winter, tidal waves, fire storms and acid rain.  Within 20 days, the global average temperature would drop from 58 degrees (F) Fahrenheit to 35 F, recovering about 10 degrees after a year or two.  By this time, 1/3 or more of the northern hemisphere (all of Canada and Northern US) would be covered year-round by snow.  The entire earth would experience freezing in the winter, and only the darkest red areas would not be frozen year-round.

 2) Surviving the "break out" after the sky clears, and the weather warms enough to begin life outside again.  The risk of unusually high ultraviolet exposure exists as the skies clear after being scorched. Disease from the fatalities decaying is a serious risk.
1) Surviving a 3-10 year winter
It could happen without any warning with only a matter of days to react.  So a high level of preparation and readiness is important. What should we prepare for?
  • Living underground where the earths temperature is more constant may be required.  If not, a well-insulated shelter with a large supply of firewood, diesel or propane would be required making an "Event" like this, one of the most difficult to be prepared for.  Note that an underground shelter also protects from radiation as well as severe storms and cold.  See: Concrete Bunkers
  • A ten year supply of long shelf life foods, water & warm clothing.  See the post:
Identifying nearby food warehouses, school cafeterias and other such places that feed large numbers might be a place to salvage food.  Animals that survive will likely be underground, underwater or able to withstand cold and eat grasses under the snow or bark and twigs of trees like goats, rabbits & deer.
  • Green House to maintain your seed supply over such a long time and provide a small amount of food.
  • Security plans with a large supply of Ammo to protect what you have. Here a few links:
                 Passive Layered Security
                 Urban Security
2)  Surviving the break out
Nothing would be worse than surviving the extended winter and then not being prepared to survive the new world.  Here is what you might need and some of this could be salvaged from hardware and farm supply stores.
  • Extensive Farming and Ranching supplies, including seeds, plants, livestock, feed, tillers, seeders, garden tools like shovels, hoes, and rakes.  Chickens, dogs, goats, pigeons, and rabbits are good animals to have.
  • Green House to grow foods year-round.
  • Hand tools like saws, axes, drills, nails, water pumps & barrels.
  • Farming and Ranching Skills
  • Security is still important as it will be easy to let your guard down at this point and be caught unprepared.
  • Reproductive age adults for human re-population.
  • Substantial loss of land based animals; large bodies of water may be a key source of natural food supply.  
  • Snow melting will cause flooding, even in normally dry places.  
  • Decaying animals may result in high amounts of airborne disease.
At this point, common long-term survival preparations are needed in addition to those to handle cooler and more erratic weather and shorter growing seasons.  There is a tremendous amount of detail regarding a long-term sustainable meal plan that is important. How much do I need to plant and how many animals do I need to raise.  The Prepper Handbook by JR Ray on Amazon covers all of this in great detail, so we will not duplicate it here.  
For additional information click on the link below:
 

Tuesday, August 1, 2017

Gas Mask

Gas Masks are one of those things that you don't talk about in front of just anyone for fear they will think you are crazy.  Yet the Rule of 3 states that you can die in 3 minutes without air making breathable air one of our top priorities.

These are great for smoke, tear gas and air borne pathogens or toxins that are not absorbed through the skin. Such masks range from $30 to $400 plus.

My favorite mask is the US Surplus Mask with a side mount NATO filter; side mount so you can shoot a rifle. These typically sell for less than $100. New NATO masks cost under $200.

But in extreme cases, full body protection is required.  Nuclear Biological and Chemical (NBC) suits have been around for years.  Today they have evolved to Chemical Biological, Radiation and Nuclear or CBRN suits.  But these are expensive starting at $200 and going up to well over $1,000. The ones that are not rubber (or similarly chemical resistant) coated material provide limited protection.


For additional information see the following links: 
Blog Table of Contents

Modern Home Security


Using your garden for cover 
Security Patrol Pack (or Bug Out pack) 
Country Home Security Plan 
Home Invasion Response Plan

Guns in plain sight
Situational Awareness 
Intruder Detection 
Riot Preparations 
Double Barreled Defense


Sunday, July 30, 2017

Sustainable City Survival

Surviving long term in the city is perhaps the most challenging place to do so.

 When we think about the challenges of sustainable survival in the city, the Rule of 3 has never been truer. This Rule of 3 states that you can die in 3 seconds without security and in 3 days without water.

The gangs and starving, robbing hoards will be a serious threat that will make Urban Survival a dark event.  You must have an Urban Security Plan that organizes the neighborhood instead of having them fighting each other and coming after your resources.  Even then traitors and back stabbers are likely.

Having enough water will be another constraint long term, even if you have a swimming pool. There are a large number of important preparations you will need, especially to protect your home. Along with Security, Water and waste removal will be your biggest challenges.

So aside from the links above, especially Security, you will need the following.

First start by drilling a water well with a faucet and then installing an automatic lawn sprinkler system, both of which will operate off of a DIY solar power system.  This will give you a long term supply of water and electricity. 
  1. Privacy Fence
  2. DIY Solar Power system
  3. Water Well
  4. Automatic Irrigation System
  5. Electric tiller
  6. Gardening tools - water hose, hoe, rakes, drip irrigation hose
  7. Heirloom Seeds 
  8. Food preparation and preservation methods
The irrigation system can be used to turn your back yard into a productive vegetable garden.  You will start by using a quite electric powered tiller to kill the grass and till all your organic waste into the soil and begin planting first turnip seeds and then other vegetable seeds that you have practiced growing on a small scale.  Start your practice garden now; don't expect to start gardening when your life depends on it.

For additional information see the following links: 
Blog Table of Contents

Modern Home Security

Using your garden for cover 
Security Patrol Pack (or Bug Out pack) 
Country Home Security Plan 
Home Invasion Response Plan

Guns in plain sight
Situational Awareness 
Intruder Detection 
Riot Preparations 
Double Barreled Defense 

Monday, July 24, 2017

DIY Solar System

There are some good power systems like the enCube (left), with a 100 ah battery, and 150 watt solar panels, which are nicely packaged.  You can also build your own system with fewer bells and whistles but with more power for your money.  A Do It Yourself (DIY) system allows you to tailor it to your needs and it serves as good training too.

The first step is to determine your needs.  What do you want to power, and for how long?  The answer could range from powering a single outlet for a few hours to powering your entire house for ever.


Lower temperature settings on heating and cooling appliances will reduce energy consumption.


There are simple tools like the Kill-a-watt ($20) that will help you determine exactly what load you will need, or can run.  This is a wise investment to avoid building a system that doesn't meet your needs.

In this case, the small fan above is using 9.6 watts on its low setting and used 21 watts on its high setting.

So after we determine our power requirements, let's suppose that we need 2,000 watts per day under two scenarios.
  1. The first scenario is to have only enough power to last for 1 day
  2. The second scenario is to be sustainable at this level indefinitely
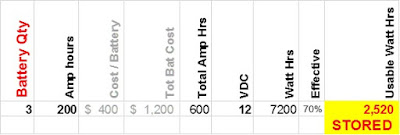
The first scenario (1 day) can be achieved with sufficient battery capacity, charged by your household electricity.  This is shown below.  Note that this includes using only 50% of the battery capacity which will extend the life. An alternative would be to have 6 of the enCube's ($1,000 each) above strategically located around your home to achieve the same results but at a much higher cost.


This is 126% of our daily needs.

The second scenario (indefinitely) will require the addition of power generating solar panels capable of generating the daily needs of electricity.


Here is the math: 4 - 100 watt solar panels ($600) with 8 hours of sun delivers  the following wattage/day:

Power generated (theoretical) = 4 X 100 X 8 = 3,200 watts.

At a realistic 70% efficiency (3,200 X 0.7 = 2,240 watts/day) the actual watts/day generated is 112% of our daily needs which would allow an additional safety factor.

Our 4 solar panels will generate 100% of our 2000 watt daily power needs plus 12% extra per day.  The battery will handle our daily needs (using only 50% of the battery capacity to extend its life) and hold an extra 26%.  This Solar Power Kit sells for $1,500.

It will take the extra solar generation capacity two days to charge our battery's extra storage capacity.  This extra will deliver 3 hours of extra power per day, or 6 hours (1/4 day) of extra power every other day. Any extra power generated beyond two days will be lost as there is no more battery storage capacity.
 
So suppose we add additional battery capacity.  This gives us 168% of our daily storage needs or an extra 16 hours.  However, it will take our extra solar generating capacity about 5-6 days to charge this extra battery storage.


Supposed we add two additional batteries. This gives us 210% of our daily storage needs or an extra 26 hours.  However, it will take our extra solar generating capacity about 9-10 days to charge this extra battery storage.


Our next step would be to add additional solar power generation, providing that our electrical infrastructure can handle it.  This may include our wiring, charge controller and 12 VDC to 120 VAC inverter.  With this (below), it would only take 3 average days or 24 hours to charge the extra battery power.


Below is a rough example of what a simple standby system would look like.  Buying a Solar Power Kit will make your first solar project much easier. 

In most cases, home solar systems require a licensed installer, but small stand-alone systems are something most handy men can do, but do NOT try to integrate them into your home wiring unless you are an electrician. 

E-mail us with questions; good luck.


Continue to watch this blog and for additional information see the following links:


Or select topics below for related articles