Sunday, March 29, 2015

Passive Layered Security for your home and property

There are several theories and techniques on how to protect your home and property from intruders. All of them have some advantages and disadvantages, and you should not take any one of them as the “end all, be all” when it comes to protecting your home and family. While I have had nearly three decades of learning and training in the art of perimeter and interior security, I am by no means claiming to be an expert.  I have seen, and used, techniques that work and techniques that are less effective.  Since this article is geared toward those that want to keep a low profile in their personal life and what they are doing to prepare for a local, state or national disaster, I will concentrate on some good ideas and techniques that both work and do not draw attention to you or your property in a post-disaster scenario.

First, I want to say that fences and walls have their place but if you put up a large or elaborate perimeter fence or wall you are almost certain to draw attention to your location.  Though you may dissuade one or two people from trespassing you will all but invite a larger, well organized group or desperate individual on to your property to see what you are protecting or hiding.  In a worst case situation the last thing you want to do is draw attention to yourself.  That said, the following are some ideas and tips to both protect your home and family and still remain below the radar.

LESS IS MORE
Yes, you read that right.  Sometimes less is more. Let’s start with perimeter security and move in toward your home.  A well-maintained property line with a good well maintained fence is good for property value but bad for security. Why? Because in a worst case scenario, desperate men will look to see what you have and be tempted to take what is yours.  The best way to avoid this confrontation is to be invisible.  The bad guys of the world won’t want to take what they don’t know exists. For perimeter fencing, I would suggest a simple T-post and barbed wire fence with a simple metal gate at the entrance.  After your fence is in place, don’t maintain the grass or trees behind it. Instead, keep only about a 3 to 4 foot space between the fence and the grass, trees and underbrush. This allows you to walk your perimeter randomly while keeping a visible barrier between the road and your home and property. 

My home is built several hundred feet off the road, and I have allowed the trees and underbrush to grow unchecked and very thick for over 200 feet into my property effectively hiding my home from the street.  This along with an overgrown dirt and grass driveway makes the outside of my property look like the thousands of properties in my area that are nothing more than a logging or hunting lease.  Specifically, you should cultivate the thorny vines and allow them to grow wild all over your fence and between the trees and brush of your outer perimeter. People do not want to fight through this type of underbrush, especially if they think there is nothing to be gained.  There are types of bushes that have some nasty prickly leaves on them that are very effective at dissuading trespassers that you can strategically plant in this outer perimeter as well.  They are thick and robust and can cause some discomfort when an intruder tries to push through them.  These outer perimeter passive security measures are usually enough to make most potential threats move on without even taking a second look.  Remember, they won’t want what they don’t know is there. 

However, these steps will not keep every threat out.  For these threats, you need both deterrents and early warning to their presence.  The first step is to “funnel” any potential threat where you want them to go.  Funneling is a military term that simply means that you direct the movement of the enemy without them even being aware of it.  The best way to do this is by using human nature against them.  We as humans are like every other animal on Earth in that we like the path of least resistance.  For the average “Joe” who is not tactically sound that is going to be walking right up your gated path.  For this individual, the best way to deter them is early warning, so a good wireless camera system is an excellent tool.  I found one (Uniden) that has four wireless IR cameras that are motion sensor activated and automatically turn on when movement is detected.  It also has a device that is similar to an iPAD that is connected to all four cameras and gives an audible tone to you as it turns on and connects to the activated camera.  This particular brand has a wireless range of 500 feet, and the motions sensors can scan up to 40 feet in front of the camera.  It costs about 250 dollars and is well worth the expense.  Since it comes with four cameras, you can strategically place the other three along your road frontage inside your natural tree line barrier.  I suggest at least 50 feet in, so they don’t activate every time a car drives by.  That would be annoying.  For those trespassers that do want to sneak on to your property, funneling becomes even more critical. 

As I mentioned earlier, people like the path of least resistance even when trying to sneak into your property so you will want to cut small 12” to 14” wide paths that are anywhere from 3 ½ to 5 feet high.  You will want to try and camouflage these funnels to look like game trails so that the intruder doesn’t realize he is going exactly where you want him to go.   You will want to make 3 to four of these that wind a lot and turn back on themselves but that all eventually lead to one place, a place that you as the protector of your home and family can utterly dominate.  A place that you have total control over and that is separated from your home by a barrier, either natural or man-made.  Along each of these trails you should put several early warning mechanisms; cameras, trip wires that activate a flare or set off a shotgun shell.  Both of these devices should be pointed into a pre-dug hole so that you don’t start a fire or injure a non-threat.  They are sure to scare the hell out of would-be intruders and make them question the decision to come on your property but more importantly, it tells you exactly where the potential threat is and gives you reaction time. 

If a would-be intruder is still set on approaching your home there are still other steps that can be taken along your “game trails” such as pitfall deterrents.   These are simple to construct and easy to hide, and they are very effective.  A hole 4 feet long, two feet wide and 3 feet deep is all you need.  Build a frame out of 2x4s that fits tightly into the hole and comes flush with the top.  The hole should be directly in your game trail.  Set the frame, then measure from one end to find the exact center of each of the top 2x4s of the frame.  Notch out a narrow slot on both sides of the frame then cut a piece of 5/8” plywood that will fit INSIDE of the frame and screw a wood screw into the edge of the plywood so that you can set them down into the notches in the 2x4s as shown below.

 
The result will be that the plywood can teeter freely like a child’s seesaw on a playground.  Once this is finished, and the plywood can freely spin on top of the frame.  Use duct tape to tape the plywood to the 2x4 frame so that it doesn’t spin.  The tape is only meant to hold the plywood in place and should freely give under the weight of a person.  After you have completed it cover, it with a light coat of the dirt and natural surrounding to hide it.  An intruder who steps on one end will cause the plywood to teeter down and they will drop 3 feet into the hole while the other end of the plywood comes up and gives them a sudden and painful warning to turn around as it hits them in the face.  There are several other possible additions you can have with this deterrent, but I will leave those to the reader’s imagination.  (JR:  My imagination is already working with using a steel rod or 2 x 4 fulcrum as shown below)


 Now in the military we were taught that it is sometimes better to injure an enemy combatant than it is to terminate them because it takes two combatants to carry one injured, effectively taking 3 out of the fight.  I have thought of putting three of these pits side by side so that when the center pit is activated two of the intruder’s buddies step on either side to help him out and they get the same surprise.  At this point, it is safe to say that anyone who wants to continue forward is not there to have tea and crumpets, so the following security measures are for a real zombie apocalypse scenario.  If a real SHTF situation is going on and you cannot depend on law enforcement to help you out, your “fatal funnel” is what will save your life.  The fatal funnel is the “kill zone” that all of your game trails lead to.  This should be a place that has a substantial physical barrier to stop the intruder’s movement forward.  A wrought iron fence about 5 feet high is a good barrier in this area.  You should have several clear fields of fire to this area from covered positions across the front and one side of your kill zone. 

Within the kill zone, you can employ some of my very own ideas that I like a lot.  Tannerite birdhouses!! A few of these at about 4 feet high can neutralize a sizable threat but should only be used in a worst-case SHTF scenario.  Each one uses 2 pounds of tannerite in its plastic container.  This is then dropped into a birdhouse that is big enough to give you roughly 3” clearance all the way around.  Mount them securely on the fence between you and the threat.  Push the tannerite container up against the side of the bird house that is closest to you and then pack the bird house with rocks, ball bearings, glass, nails or screws, whatever you have available is fine.  Secure the top of the birdhouse in place and forget about them indefinitely.  They are always there until you need them.  Please understand, if you have gotten to the point that you have to use these, the next step is fire power and blood will be shed.  These are not for simple trespassers.  These are for those intruders that have made it clear they are there to harm you and your family or steal what is yours in a SHTF worst case scenario and should NEVER be used when you can still call the police.  These are a group devastation weapon to even the odds in your favor and should only be in place after all hell has broken loose. 

I hope that this article helps fuel your creative juices and enhances your personal security needs.  There are several ways to modify these measures to best protect your family and property so use your imagination and God Bless you.

Chiefton4

For additional information see the following links:

Survival Pack (Security Patrol or Bug Out pack)

Friday, March 27, 2015

Why we are all Preppers

There are things in life that occur which are beyond our control; “Events” as we will call them, that can put you and your loved ones in danger. However, your level of preparation IS within your control.

The risk of your home catching on fire is small, but the consequences can be severe. Being prepared can greatly improve the chances of survival for you and your family. This is why we have smoke detectors and likely a fire extinguisher in our home. To do otherwise is potentially negligence or even illegal. But guess what most people die from during a fire? Smoke inhalation. Remember this later as we talk about the rule of 3.

Our government through FEMA (www.fema.gov/ ) and several other agencies (www.CDC.gov  www.Ready.gov www.Flu.gov  www.hhs.gov and www.redcross.org ) say that everyone should have some basic preparations. Things like a minimum of 3 gallons of drinking water stored per person and a lot more that you may not know about. Everyone, especially those of us who are responsible for others should have some level of emergency preparation.

Most Police Officers never fire their gun in the line of duty. Despite this, they still wear a bulletproof vest because the consequences of being shot can be severe (death) even though the likely hood of it happening is very low. The chances of a crisis or life-changing “Event” occurring are small, but the consequences could be fatal if not prepared, much like the Police Officer not wearing a bullet proof vest.

In these examples, we see preparing as just good sense, not prepping. But it IS Prepping. However, we are less likely to have any preparations for more severe Events & consequences. So what happened to good sense now? Shouldn’t we have our own “bullet proof vest” (figuratively speaking) or some sort of low-cost insurance for serious events? Perhaps we should have a few basic preparations like extra food, water and ammo?

So how do we start prepping? The answer is by reading this book or blog, assessing your current level of preparedness, and then developing a sensible plan that will help protect you and your family from potentially real Events that are beyond your control. The Beginner Prepper List offers a good starting list of how to prep.  Next look at the Prepper Incremental Strategy.

Take this test by National Geographic’s Dooms Day Preppers as a starter. http://channel.nationalgeographic.com/channel/doomsday-preppers/interactives/how-prepped-are-you1/

Remember your initial score and make a list of your findings, and then read on and remember:
The Rule of 3 – you can die in:
  1. 3 seconds without security
  2. 3 minutes without air;
  3. 3 hours without shelter (in hostile weather);
  4. 3 days without water &
  5. 3 weeks without food.
This rule will help us set our priorities.

For additional information see the following links:


Beginners:
The Rule of 3 (set priorities by this)

Friday, March 13, 2015

Getting Started


I am often asked by those looking to start getting prepared for disaster, “What should I do first?”

Our post today is a re-post from the Prudent and Prepared Blog found at www.prudentandprepared.blog.com. This post along with Building your food stores the right way  will give beginners a good start.

It is a natural and necessary question. When someone makes a decision to begin preparing for unforeseen events it can often seem quite daunting. At this point I think it is necessary to take a deep breath and simply start with the 3 basics, food,water and shelter. I always advise that the first item you should secure in your preparations should be water.

It is recommended that the average person drink a gallon of water per day, so if you have a family of 4, imagine needing 4 gallon size milk jugs of water every day for up to 10 days. And that is just for drinking, let alone flushing the toilet, cooking and washing. To be even a little bit comfortable, we can calculate that each person will need at least 2 to 3 gallons a day. That starts to add up.
 So where do you start? I suggest you first calculate how much water you will need. For my family of 4, I have calculated 3 gallons each per day and I have decided that I will have enough for 10 days. I need to have at least 120 gallons for potable water stored. To that end I have four 55 gallon, food safe plastic barrels always filled in my back yard. The water in these barrels has been treated with unscented bleach to keep the water clean of bacteria and I empty, clean and refill these every 6 months. As an added precaution, I have a plan to fill each of my 2 bathtubs and numerous 1 to 5 gallon containers that I have on hand with fresh water from the tap, before the taps run dry. If this last provision is the first and only thing you do to secure water, I recommend doing so within the first 4 to 6 hours after the disaster hits (of course, the sooner the better).

Water taken from our lake or creeks will need to be filtered, treated or boiled and if you hope to get your water from these sources, you will need to have a plan and supplies in place.
 If you decide to filter your water, there are numerous filters on the market that will fit the bill and you will need to determine which of these works with your needs and budget. Be sure any filtration system you get filters down to .02 microns. This will remove up to 99.999% bacteria and most viruses and chemicals. Filters will only be effective for a certain amount of gallons, so be sure to have replacement filters on hand.

You can also use chlorinated unscented bleach or boiling to make the water safe for drinking. If you are using bleach, be sure it is unscented, put into an uncontaminated container and add 8 drops per gallon of water. Mix well and wait for 30 minutes. The water should have a slight bleach odor. If it does not, repeat the process.

Boiling requires a source of heat. Without power, your electric stove will not help, and your BBQ grill will need propane. I keep 4 extra propane tanks on hand at all times, not only for water purification but also for cooking. Both treating with bleach and boiling will kill off the nasty little bugs, but it does nothing for chemical contamination and floating particulates in the water. I keep a supply of coffee filters on hand should I need to filter what I can of these out of treated or boiled water (clothing and fine thread towels work well too).

Now that you have taken steps for potable water for whatever time span you feel is prudent, you can move on to what I consider to be the next important item on our list of basics, food. I will address this in my next post, until then, begin to assess your current situation. What are your assets that you want to use toward your preparing? When will you be satisfied with you level of preparations (ex. Enough food, water and supplies for a family of 4 for 10 days)? Are you comfortable with preparations beyond the 3 basics (medical, defense, learning new skills, transportation, homesteading, etc.)?

When disaster strikes, don’t panic…..you are prepared.


For additional information see the following links:

Sunday, March 1, 2015

Green house for a year-round food supply by J Loy


Have you ever heard “3/3/3” can kill you? Three (3) minutes without air, 3 days without water, and 3 weeks without food. I sure hope that you will make it beyond this point. If so, one of the most important long-term issues is food supply. In a real life SHTF/TEOTWAWKI, the wildlife population will be hunted out in a matter of a few weeks to a few months. Hunting is a great skill to have, but only until the wildlife is decimated.

            Prepping is simply preparing for the future by taking precautions against potential risk. Whether it is on a grand scale or on a small scale, year round food is the ultimate in long term prepping. It is also healthy in our every day lives to have fresh grown foods. I started out this winter on a quest to build a green house. While the construction went easy, and without many hiccups, this write up is to demonstrate some of the do’s and don’ts that I have learned by trial and error.

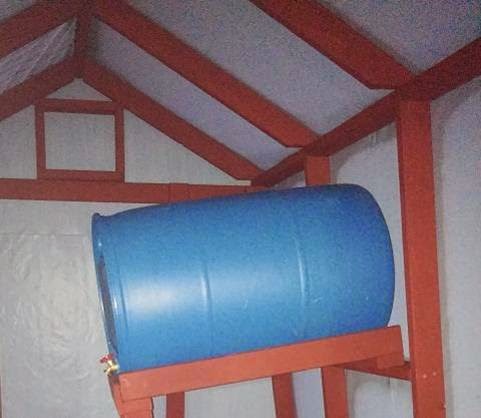
I planned to kill two birds with one stone by placing a 55-gallon barrel elevated off the ground, use it as a gravity fed drip irrigation system, and help keep the green house warm.


 The irrigation portion of it worked really well but I was also hoping that during the day the water and the barrel would heat up and radiate heat over night warming the greenhouse. During the day, even in Texas cold weather, the greenhouse heats up nicely, however it does not hold the heat well at night. In theory, it was a brilliant plan, and the temperature of the water in the barrel stayed warm, but was not enough to radiate sufficient heat overnight. 

A simple space heater would do the trick; however, it needs to be adjustable. A handy product from http://www.thermocube.com offers several small outlets that have a build-in thermostat. The TC-3 will help keep your green house from freezing. You can run power to your greenhouse, and use this inexpensive device to plug your space heater in. The device automatically turns on the heater and turns off at various built in temperatures. Unfortunately, I did not find out about this device until after the greenhouse froze over. I have yet to use it during the summer months where getting too hot is a concern.

Now you might ask, why not use a garden hose and/or a sprinkler. A garden hose is an excellent way to irrigate. It allows you to water when needed and convenience of not having to purchase additional equipment. Some things to consider if thinking about using a water hose is the proximity of the greenhouse location to the hose itself. In addition, if you are planning to use a hose in the winter months, you might want to think of an alternative. In the winter months, the "tap" water can be near freezing temperature (and scalding hot in the summer). Plants do not like cold showers as much as people do not, so the rain barrel is the route that I went. I can fill up the barrel when it is getting low and during the day, the sun will help warm the water so it is not as cold. I have thought about doing my own rain catchments, but right now, the greenhouse is not large enough to warrant it especially in the winter months when watering is less needed then in the heat of summer. A ceiling mounted sprinkler is an option I gave a lot of thought to, but it too would be cold the winter and hot in the summer. It would also get the entire greenhouse wet, not just the plants. 

As I mentioned before, irrigation was simple. I constructed a simple stand that would support a 55gal drum at a downward angle to assist in the flow of water. At my local farm supply store, I found a complete drip irrigation system for about 30$. Assembled and attached to the drum and voila’, simple adjustable irrigation. It took some close monitoring and adjustment to get the flow just right. I ended up setting each drip valve at its near lowest setting and manually turn the valve on in the evening and let it run overnight. Due to the mechanics of a greenhouse, the humidity should stay relatively high, so only water when necessary. Over watering can, be as bad as under watering.  


www.howtospecialist.com/garden/greenhouse/how-to-build-a-small-greenhouse/

MATERIALS:
1.       SIDES
a.       2 pieces of 2×4 lumber – 120” 
b.       2 pieces – 113”
c.       10 pieces – 85”
2.       ENDS
a.       2 pieces of 2×4 lumber – 80” long 
b.      1 piece – 96” 
c.       1 piece – 65”
3.       ROOF
a.       1 piece of 2×6 – 120”  1
b.      8 pieces of 2×4 lumber – 40 ¾” 
4.       DOOR
a.       2 pieces of 2×4 – 32”
b.      2 pieces – 73”
c.       1 pieces – 25” 
5.       TOTAL
a.        (5) 10’ 2x4s
b.      (21) 8’ 2x4s

I hate Moles and Gophers. I wish there was an easy way to get rid of them (JR Ray comment: that would be a post worth reading). I believe they can smell plants and are drawn to it like a vulture is to fresh road kill. Multiple products on the market can, and will temporarily rid your greenhouse of these annoying rodents. The electronic deterrent devices, flat out do not work. Do not even waste your money. Traps and poisons are the only sure fire way to get rid of these guys, but traps are dangerous to family pets, and to you when placing them. Poisons are just that, poison. I would not want to trust a poison and the possibility of it getting into my plants, and or ME! However, there is a better solution. Moles will typically dig down to about 40 inches deep. If I could do it all over again, (and I probably will), I would purchase or find a few pieces of corrugated tin or plastic or plywood. Rip it into lengths of about four feet wide and as long as each side of the greenhouse. Then dig them down and place vertically in the ground so the top of it just barely sticks up out of the soil and butts up to the greenhouse. The other alternative to this would be to build raised beds within the greenhouse itself. If you are like me, you like to use what you have on hand. Some of you may have the wood to build raised beds, or the material to quarantine off four feet deep around your greenhouse. Either way, this is sure to almost eliminate your problem. (JR Ray comment:  Using a narrow ditch witch to dig a trench around the green house as deep as possible and pouring it full of concrete should help).
 
Crop rotation and planning is important to a consistent harvest. Like me, you may choose to can some of your goods. Planning is going to be an integral part of your crops. For instance, lettuce is not something that keeps for extended periods. Therefore, I started ten seedpods, ten to fourteen days later I started another ten pods. As I harvest lettuce, I replace them. Other plants can carry the same concept, zucchini, squash, eggplant etc. (JR Ray comment:  Look for ever-bearing plants that continue to produce like Okra rather than a climax variety that puts out then dies)

While your experience may differ from mine, I hope that this has given you a few things to consider with your greenhouse. 

            J Loy


For additional information see the following links: